Contents of This Article
- Overview of Backup Methods
- External Hard Drives
- Drag-and-Drop Backup Method
- Checking Your Backup (Beware of Aliases!)
- Time Machine Backup Method
- File Servers
- Cloud Backup Services
- Transferring Your Data Back
Overview
To prevent data loss, it is extremely important to back up your files regularly. Data is “backed up” when it is saved in at least two locations. This can mean an internal hard drive of your computer and an external hard drive, on two external hard drives, or a hard drive and a cloud service. In this article, we’ll go over backup methods including Drag-and-Drop, Time Machine, and cloud services such as Dropbox and Google Drive.
Data saved on only one piece of storage media (such as a single hard drive) will be irrecoverably lost if that device fails. Laptops are increasingly built without replaceable or removable components, which means that if any part of your computer breaks, your hard drive and the data on it may become inaccessible. Data saved only on one external hard drive is also particularly vulnerable, especially since those drives are likely to be carried around, dropped, suddenly unplugged, etc. ALL hard drives fail eventually, no matter what, and after about 3 years the chances increase dramatically. Additionally, if you are having your hardware repaired or getting an updated software build, you must make a full backup of your data beforehand.
External Hard Drives
External hard drives are plugged into your computer’s USB port and provide extra storage space. They can be purchased online or at electronics stores and usually start at about $60 for 1 terabyte (1000GB). If you work with large amounts of data, you may need multiple external hard drives. For more information about Hard Drives please visit this article.
Drag-and-Drop Backup Method
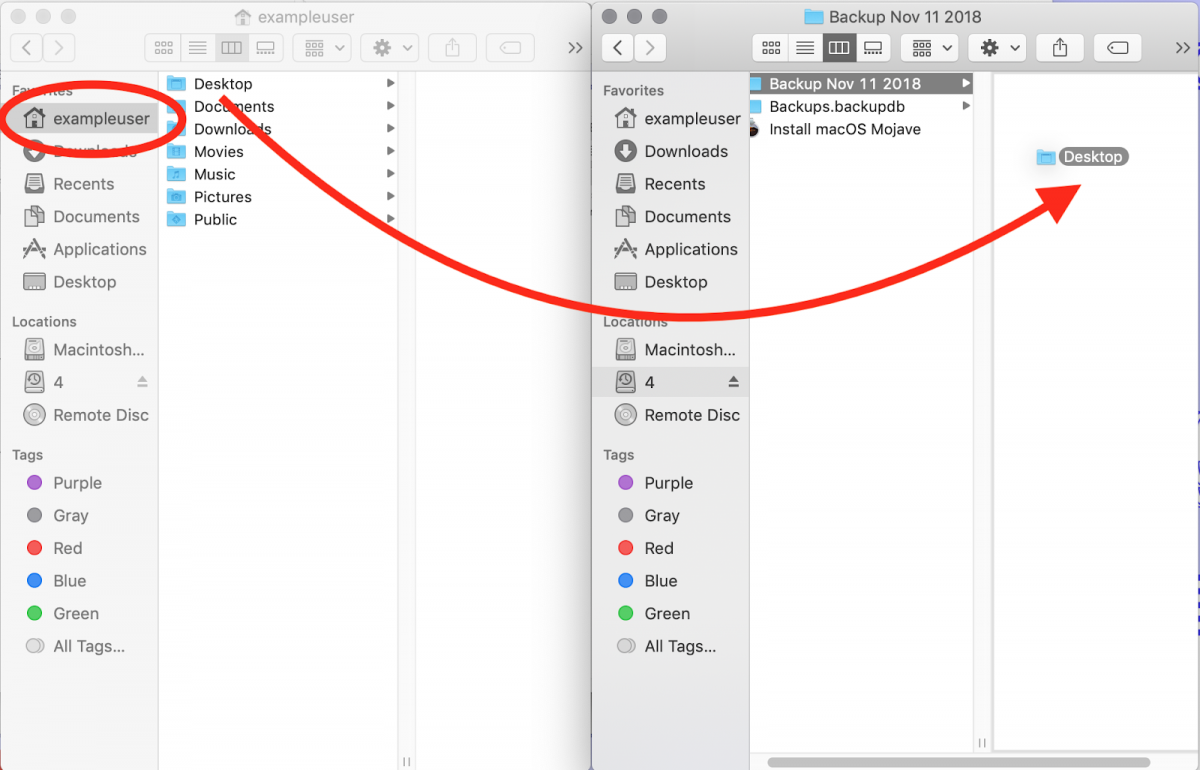
One of your options is to back up your data manually. If you choose this option, please also read the section below this one on checking your backup! Once you’ve plugged in and initialized your external hard drive, you can simply drag and drop (or copy and paste) the data from your user folder on your computer (a folder usually named after your MCAD username) to your external hard drive. We recommend opening two Finder windows side by side: one to view the data on your computer and the other to view a new folder on your external hard drive where the backup will be stored (you may want to include the date of the backup in the name of this folder). Drag each folder from the first window (Desktop, Documents, Pictures, etc.) into the folder in the second window and wait for the files to copy completely. The idea is to make the folder structure of the files in your backup look just like the original folders on your computer. This helps make it easier to confirm that you copied all the data properly and to transfer your files back to where they came from later on.
This is an effective way to back up your files, but it requires more manual attention and will not back up data that is stored in hidden folders, such as bookmarks, sticky notes, locally stored Apple Notes, app preferences, and other data. This method may be preferred by users who don’t store very much data locally on their computer. For a more complete and automatic backup, use Time Machine.
Checking Your Backup (Beware of Aliases!)
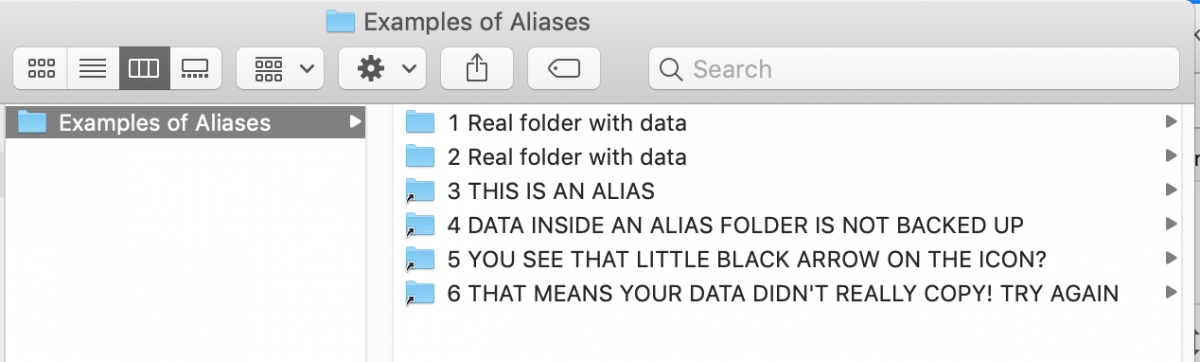
Once you’ve made a manual (drag-and-drop) backup of your data, it’s a good idea to check that data to make sure it is saved on your external hard drive. One risk is accidentally creating “aliases” of your files, which are links or shortcuts that point to the original file rather than a true copy of the data itself. If the icons of the files/folders that you dragged and dropped to your external hard drive have little black arrows on them (see screenshot), they did not copy properly and are NOT backed up!
You can also confirm your data is properly backed up by looking at the sizes of the files/folders in your backup to see if they match the sizes of the original data. You can do this by clicking on a file in column view mode and viewing its details in the pane on the right; you can also right-click a file or folder and select “Get Info” for more details including the file size. If you ever want help confirming your backup, stop by the Help Desk.
Time Machine Backup Method
NOTE: Time Machine backups can be a little tricky to deal with if you need to restore data after a catastrophic failure due to some of the aspects of being on MCAD's software management system, and recent changes to how Apple allows access to Time Machine backups. Please see the note about restoration of files at the bottom of the article for some additional details.If you are on a Mac, you can use Apple’s Time Machine utility to make a full copy of ALL data on your computer’s hard drive, including hidden folders and other user accounts. This method is recommended for faculty or staff who are upgrading to a new computer.
To use Time Machine, your hard drive must be formatted MacOS Extended (Journaled), as described in the “Setting up your external hard drive” section of this article. Plugin your external hard drive, connect your computer to a power source and open the “Time Machine” section of System Preferences. Use the “Select Disk” button and find your external hard drive.
There are checkboxes you can select to enable automatic backups or to place the Time Machine icon in your top menu bar. From the icon in the menu bar, you can manually tell your computer to “Back Up Now” when your drive is plugged in, even if automatic backups are off. For detailed instructions with screenshots, see this Apple Support article on Time Machine.
Backups are stored inside dated folders within a folder called Backups.backupdb on your external hard drive. The first time you make a Time Machine backup, it often takes many hours for it to make an initial copy of your computer’s entire file system. You may want to plug your computer into power and let it run overnight. After this, subsequent backups will be very brief, as Time Machine only needs to copy data that has been changed since the last backup.
File Servers
Students have some limited storage space on their studio server (found at afp://studio.mcad.edu) and on the class server (afp://class.mcad.edu). Learn more about the class server here.
For Staff: MCAD's file servers provide a safe and secure location for MCAD data. Windows users primarily work off Maverick to store individual and departmental files. MacOS users can use their individual staff network home directory or a specially configured departmental share for file storage. Please contact the MCAD Technology department or your staff supervisor to determine which overall network storage solution is best for your office needs.
Cloud Backup Services
Google Drive
The MCAD institutional Google accounts provided to most faculty, staff and students come with unlimited storage space in Google’s cloud storage service, Google Drive. This can be a great place to store copies of important files and works particularly well for sharing data between users. You can also install Google Backup and Sync, a service that will automatically back up the data in selected folders on your computer to your Google Drive.
However, once you leave MCAD, your MCAD Google account will be deactivated and any data stored within the associated Google Drive must be transferred to a personal account before access is lost (see our article about Graduating or Leaving MCAD for instructions). Personal Google accounts only come with 15GB of free storage, but more can be purchased for a few dollars a month.
Dropbox and iCloud Drive
Dropbox and iCloud Drive are both alternative cloud storage platforms that work similarly to Google Drive. Data is stored in an online repository connected to any account you have created. While both can be used effectively, at this time we do NOT recommend using the iCloud drive as a primary backup method due to a variety of issues we have witnessed with this service. Contact the Help Desk for more details.
MCAD Managed Cloud Bakcup Solution
Certain Faculty and Staff have the data on their MCAD owned computers backed up to our institutionally supported backup service. This service is offered to employees at director-level and above, departmental chairs, and select others who handle sensitive institutional data. Users belonging to this group will have the backup client deployed to their workstations when issued to them, and once signed-in to the client will have the data from their Home/User directory automatically backed up at regular intervals. Please see the ITS Workstation Backup Policy for more information on MCAD managed cloud backups.
Transferring Your Data Back
Sometimes it is necessary to transfer data from a backup to your computer (for example, after having your computer reimaged or repaired, or after a hard drive failure). If you created a manual backup using the drag-and-drop method, the process is almost the same but in reverse: open two Finder windows and drag your files back to where they belong.
If you created a Time Machine backup, you may have some decisions to make about how to restore your data. Generally, we usually do NOT recommend using Time Machine’s built-in “Restore” or “Inherit” options as this can cause errors with conflicting applications and settings for computers enrolled in our management systems. However, if the primary concern is to restore things to exactly the previous state, then a restoration through Migration Assistant during the One-Time Setup Experience is usually the best way to do this. A manually drag and drop your data from the user folder in your backup to the user folder on your computer, just as you would for a manual backup, is possible, but new restrictions to permissions with modern versions of macOS might make this difficult if you don't have access to the account password that was used to create the Time Machine backup. That said, to locate the user folder inside your Time Machine backup, open the Backups.backupdb folder on your external hard drive > the folder with your MacBook's name > the most recent dated folder > Macintosh HD > Users > your username. For assistance with this or help locating specific hidden data, contact the Help Desk.
If you run into any issues with backing up your data, please contact the MCAD Help Desk by emailing helpdesk@mcad.edu or by phone at 612-874-3666.