The short answer
All of the color printing services offered at MCAD are digitally-based, whether they use ink or toner. For most purposes, and most users, working in RGB should produce the best results. If you want to embed or assign a profile to your file(s) we recommend Adobe RGB 1998.
The longer answer
Conventional wisdom holds that you work in RGB for screen-based work, and CMYK for work that will be printed. That is no longer the convention. The reason for this change is because today's digital printing technology, while still using CMYK-based inks and toners, can often reproduce a lot of the brighter and more intense colors of the RGB color space than can printing on traditional CMYK presses.
If you are working on a project that will eventually be printed by a commercial printer on a web, offset, or litho press, your files will eventually have to be converted to a CMYK color space (more on that later).
For any digitally-based printing (including all color printers at MCAD) you can work in RGB to achieve the best results. You can also work in both color spaces at the same time if you like (see below for more details).
What's the Big Deal?
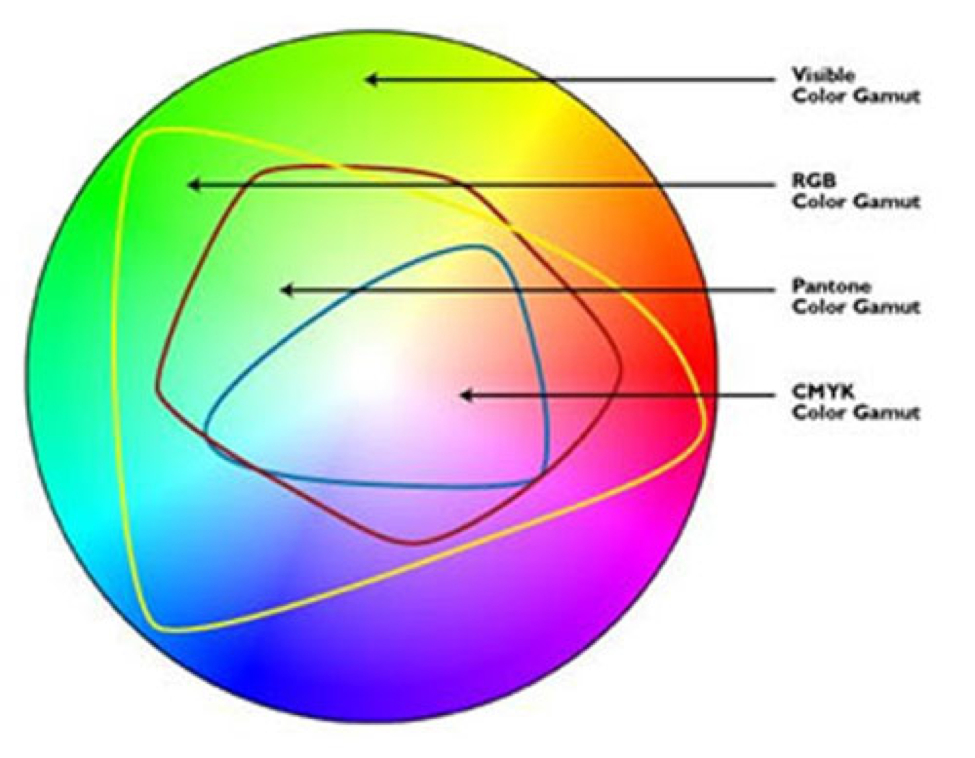
RGB and CMYK have different color ranges - or gamuts - they can reproduce. RGB has a larger gamut, or range of colors, than CMYK.
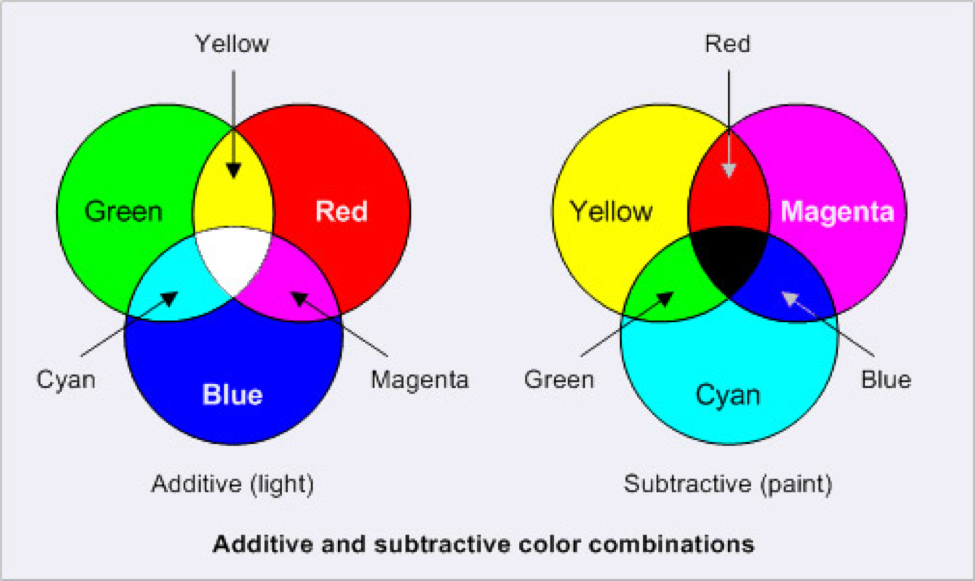
RGB is an additive color space and is light-based. You add together Red, Blue, and Green lights/colors to get white. This is how your monitor/tv/projector works. Think of theater lights.
CMYK is subtractive and is pigment-based. You mix together Cyan, Magenta, and Yellow to get black (the K is for Key Black which is used to achieve a deeper/richer black than can be achieved by mixing CMY alone). This is how paint works.
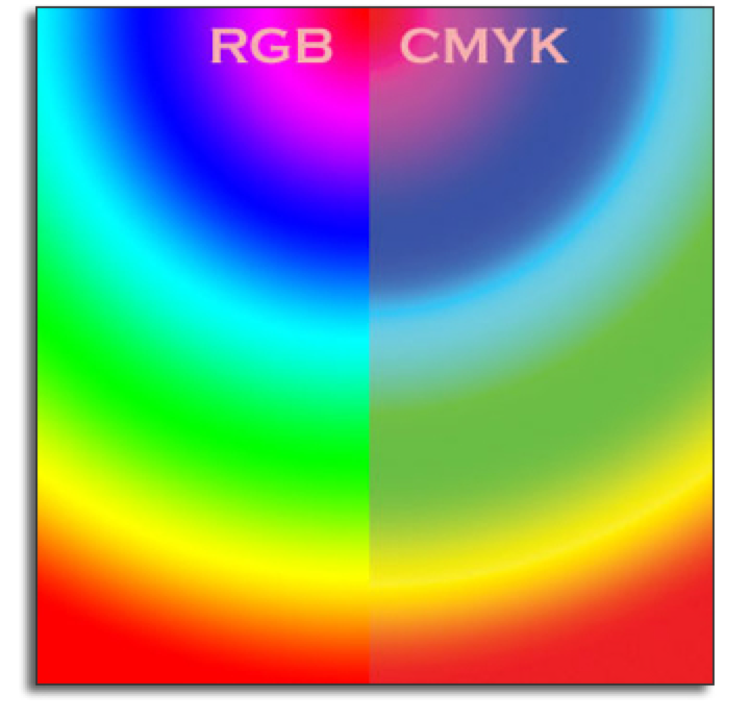
Here is a comparison of typical RGB and CMYK gamuts.
And here is an example of bright RGB colors when converted to CMYK.
It is always best to work or design keeping in mind the final intent of a project. However, it is now very common for projects to be used across both print and digital media. For this reason there are some who would recommend always working in RGB from the start and only converting to CMYK if/when warranted for traditional printing.
Recommended Global Color Settings for Printing at MCAD
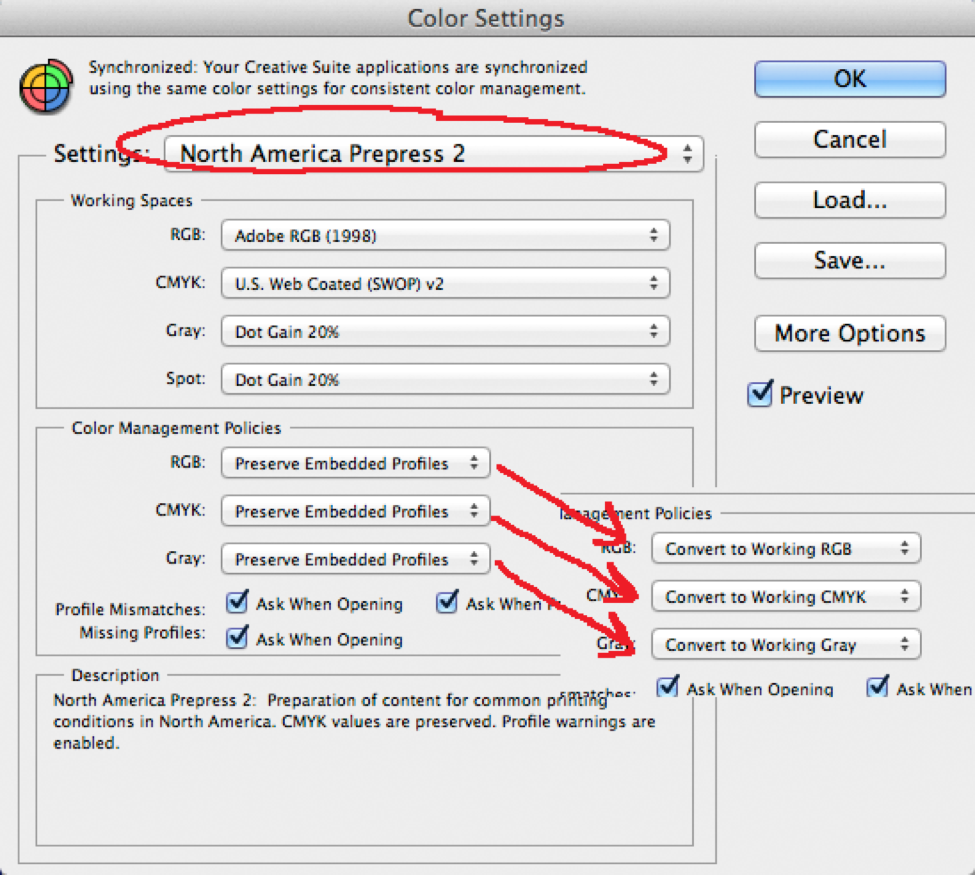
• For Photoshop, Illustrator, and InDesign use the North American Prepress 2 setting
• Within each application go to Edit > Color Settings
• Choose North American Prepress 2
• Change both of the Preserve Embedded Profilesoptions to Convert to Working RGB/CMYK/Space
• Make sure both Ask When Openingand the Ask When Pastingboxes are checked
• This will warn you when opening any files that have embedded profiles that don't match with your working profile
WORKING IN INDESIGN
Color spaces in InDesign are attached to the individual elements you create or import. An overall colorspace or profile can be assigned when exporting or printing. I recommend the following:
• Design elements created within InDesign (any vector graphics like lines, shapes, strokes, etc.): create these using the color slider (RGB or CMYK) you're most comfortable working with (you can also create custom color or pantone swatches).
• Images imported/placed within InDesign: keep these in RGB mode as long as possible and only convert to CMYK if needed (see info below for converting images in Photoshop).
WORKING IN ILLUSTRATOR
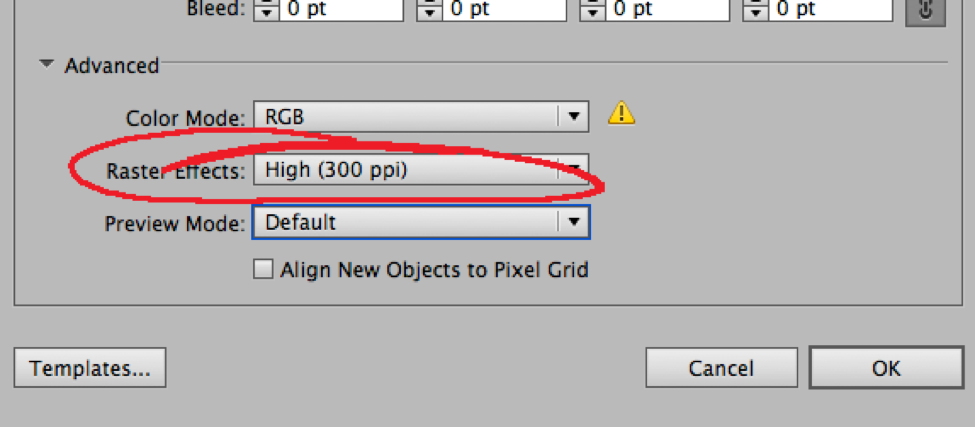
When you create a new document in Illustrator you can choose from document presets like Web (RGB) or Print (CMYK) settings. You can always go back and change the color space of your document, or convert the color space of individual objects (and preview Proof Colors).
• Note that if you choose the Web preset to work in the RGB color space, you want to go under the Advanced settings and set your Raster Effects setting to 'High (300 dpi).'
(Same thing as InDesign applies to any linked or embedded images - keep those in RGB as long as possible and only convert to CMYK if needed (see info below for converting images in Photoshop).)
WORKING IN PHOTOSHOP
Digital Originals (i.e., digital photographs, scans, or content created within Photoshop, etc.)
Work in the RGB colorspace. You will preserve the most color information this way. If any of your content is eventually going to press, you can perform the conversion to CMYK yourself (recommended) or have your print vendor do it (see below for one recommended method).
Here is one recommended method for conversion of RGB images to CMYK.
To avoid the need to make colour adjustments after the image has been converted to CMYK, first ensure your proof settings are correct (View > Proof Setup > Working CMYK). To turn this on, select View > Proof Colors (or Cmd/Ctrl + K) to simulate the outcome of converting to CMYK. Remember to select this again to turn it off afterwards.
Two useful options to your proof settings can be found under View > Proof Setup > Custom. _Simulate Paper Color_ and 'Simulate Black Ink_ options will reduce the contrast range of your proof view to that of ink on paper. Turning this off will extend the contrast range to that of the monitor. This is helpful when working on image detail.
As your eyes adjust to changes in lighting conditions, both are acceptable working methods, but if you want to be able to hold a print up along side the monitor and get a good match, then these options should be selected.
When your image has been colour corrected, save a master copy in RGB so -- if needed -- you can modify it later with the maximum colour information.Then proceed to scale it to the required size, apply _Un-sharp Masking_ and then choose IMAGE > MODE > CMYK, saving this as a new image file.
COLOR MANAGEMENT FOR PRINTING TO THE IMAGEPRESS
(color management settings for the Epsons are in the manuals at each print station)
PHOTOSHOP
After you go File > Print and make your page settings, etc.
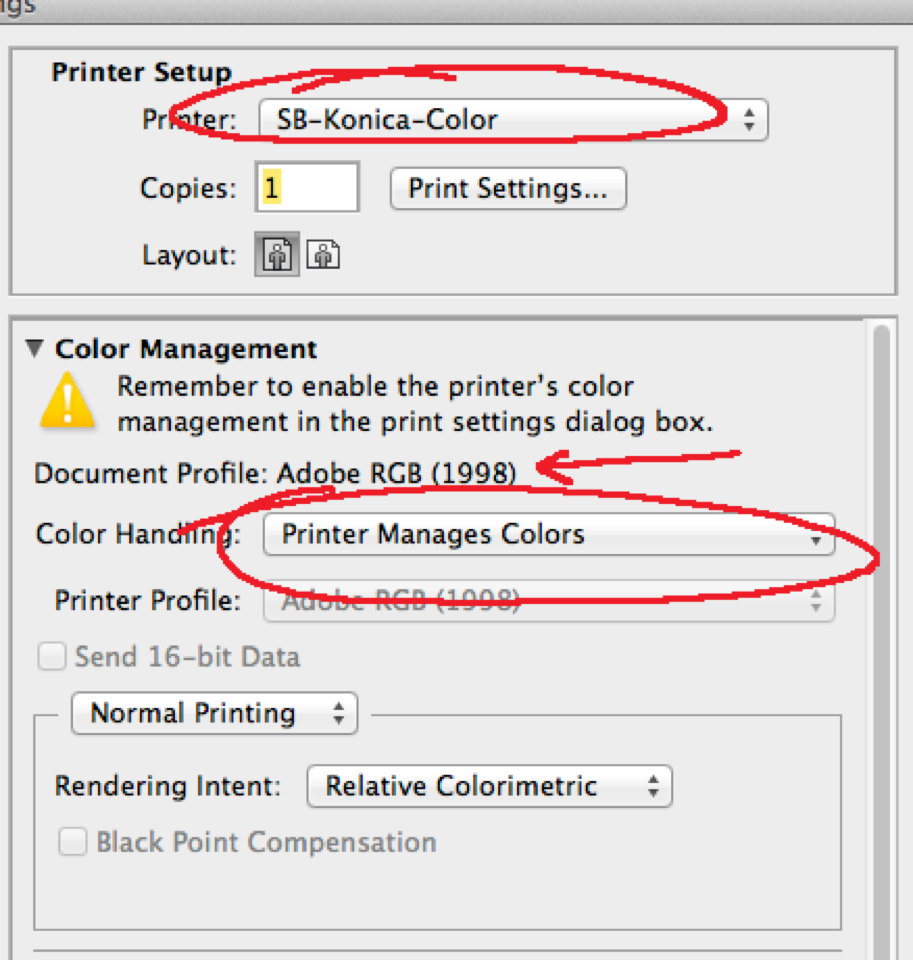
• Under Color Management
• Make sure your document profile or working space is set to Adobe RGB 1998
• For Color Handling choose 'Printer Manages Colors'
• Choose Normal Printing and leave Rendering Intent set to Relative Colorimetric
ILLUSTRATOR
After you go File > Print and make your page settings, etc.
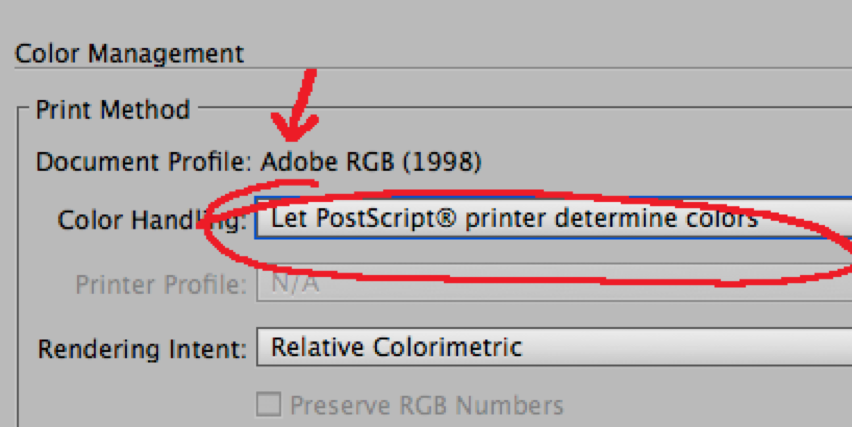
• Go to the Color Management section
• Set Color Handling to 'Let Postscript Printer Determine Colors
INDESIGN
You have a couple choices here based on how you set up your file, and how you want to print it. The ImagePress's RIP is set up to recognize and process CMYK and RGB separately if they exist in the same document. So you can send your document that way, or you can send all the info in RGB. Both processes seem to work equally well but, again, depend on your original color settings and workspace.
a) Print with mixed CMYK and RGB color spaces or with any native color spaces unchanged
- • After you go File > Print and make your page settings, etc.
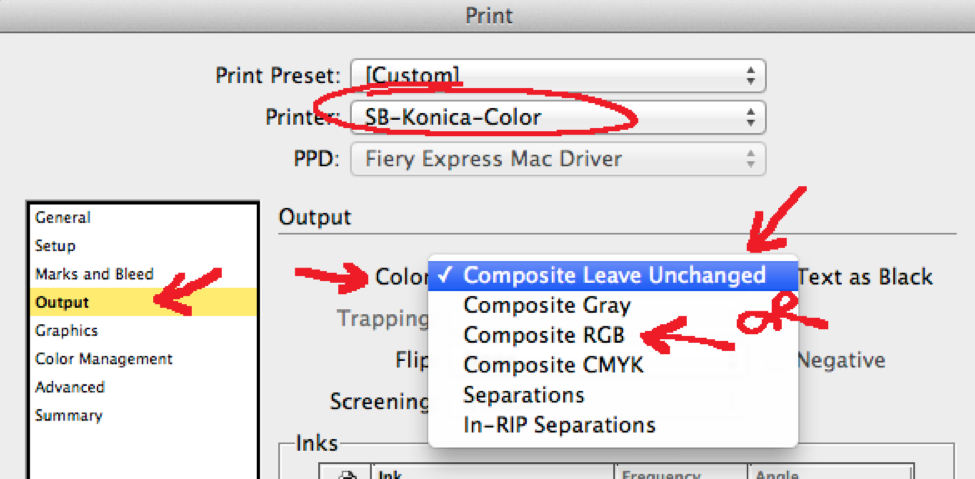
- Go to the Output section
- Under the Color menu choose 'Composite Leave Unchanged'
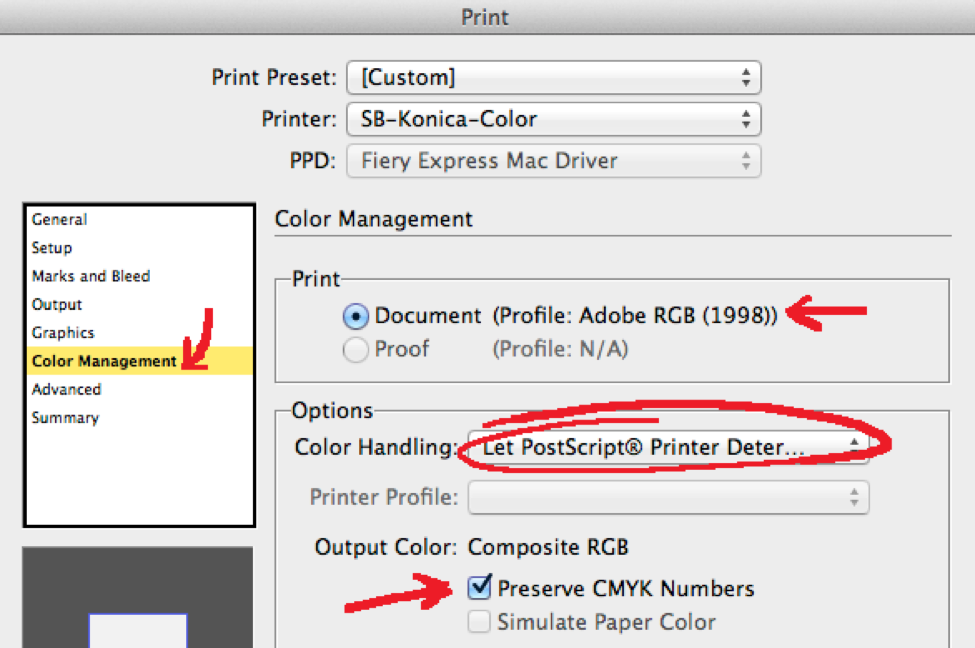
- Go to the Color Management section
- Under Print leave the 'Document' profile button clicked
- Under Options and Color Handling choose 'Let PostScript Printer Determine Colors
- Leave the 'Preserve CMYK Numbers' box checked
b) Print everything as RGB
- After you go File > Print and make your page settings, etc.
- Go to the Output section
- Under the Color menu choose 'Composite RGB'
- Go to the Color Management section
- Under Print leave the 'Document' profile button clicked
- Under Options and Color Handling choose 'Let PostScript Printer Determine Colors
- Leave the 'Preserve CMYK Numbers' box checked
COLOR MANAGEMENT SUCCESS - LEVEL-UP!