Ways to Track Hours
Hourly employees will begin clocking in using Paylocity starting April 11th (the start of a new pay period). If you haven’t already, complete the 20 minute training on how to record your time (Time & Labor for Timesheet Employees). There will be two ways for you to track time, so talk with your supervisor about what method is being used for your team. Detailed instructions with screenshot for both methods are found in this article. For more info on logging in to Paylocity and other tips, see this article.
TIMEKEEPING = WHAT? Paylocity timekeeping is the time card system. Within the system and training materials you will see it most often called Time & Labor, but you may also see/hear it called Time & Attendance or WebTime. It is all the same thing.
BROWSER HINTS: Paylocity is browser neutral, but we have found that for timecards it works BEST in Chrome and Safari. It has had the most issues when used in Firefox, so we would recommend avoiding Firefox if using to adjust/approve timecards.
CLOCKING IN AND OUT: For employees whose team is using this method, there are multiple ways to clock in aand out at the start and end of each shift.
- Self-Service: On your work computer, after logging into Paylocity, a time clock will populate the upper right hand corner of the self-service portal.
- Time & Labor: If you select TIME & LABOR from the drop down or LAUNCH TIME & ATTENDANCE from the timeclock in the upper right corner, it will display TIME & LABOR and a timeclock where you can also clock in or out.
- Kiosk Clock: On one of the tablet clocks (also called ‘kiosk’ clocks).
- Mobile Punch: If using the Paylocity mobile app, use the “Punch” function.
ENTERING YOUR HOURS: This method is for employees who need to enter hours into their timecard within Paylocity after a shift has been completed, rather than clocking in and out. After logging in, click on LAUNCH TIME & ATTENDANCE or from the upper left hand drop down, select TIME & LABOR. Then click on TIMECARD.
Approving Timecards
After the pay period ends every other Friday, hourly employees should review and approve their timecard by 10am the following Monday. To approve your timecard, log in to Paylocity and either select TIME & LABOR from the drop down or LUNCH TIME & ATTENDANCE from the timeclock in the upper right corner. Once in TIME & LABOR review your timecard to make sure everything looks correct. If changes are needed, you can make them (with supervisor approval) or talk with your supervisor. There are two ways to approve your timesheet. You can either select the checkmark above APPROVE for each day OR you can select APPROVE ALL. Then click SAVE.
PLEASE NOTE:
Badge Number: This is your MCAD Employee ID. For some this is also the number on your MCAD badge key. If you log into Paylocity, your employee ID will appear if you hover over your picture or initials in the upper right hand corner.
Mobile app: Use of the Paylocity mobile app for clocking is enabled for all hourly employees. However, use of the app to clock in and out is for employee convenience only and not required. All hourly employees have access to other forms of tracking time (kiosk, self-service time entry, and entering hours with supervisor approval).
CLOCKING IN AND OUT
Below is an overivew of the four ways to clock in and out at the beginning and end of your shift.
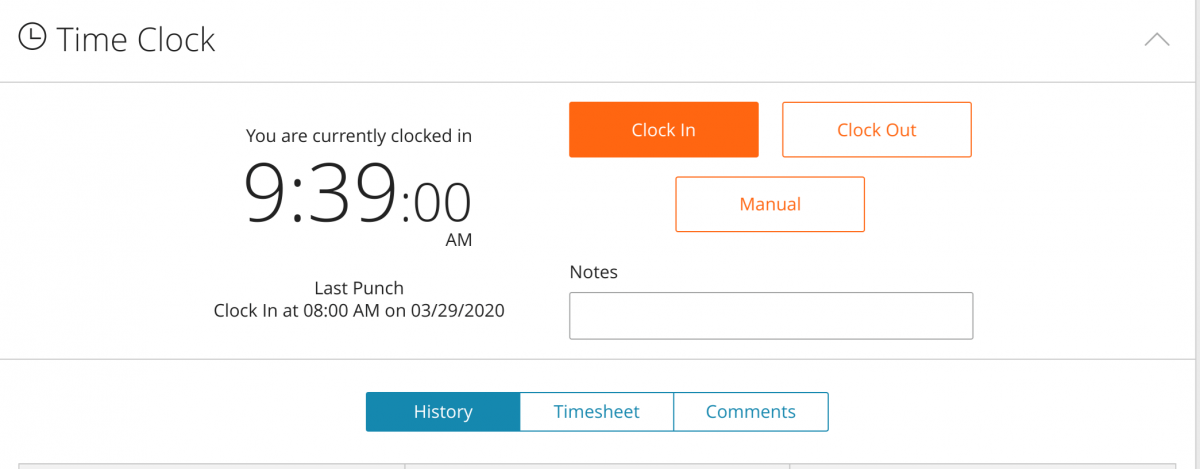
1. Clocking in from Self Service:
After logging in to Paylocity, you will be able to clock in and out from the Self Service Portal. There will be a time clock in the upper left hand corner of Self-Service (shown in the image below). To clock your time, select the appropriate Punch Type from the available buttons. Note that if you are already clocked in, the Clock In button will not appear (and if already clocked out, Clock Out button will not appear). Once the button is pressed, above the clock you will see your current status. A MANUAL punch will allow you to leave a note to your supervisor to correct a clock in or out. For example, if you go to clock out for the day and realize you hadn't clocked in, you can add a MANUAL punch and leave a note saying "I forgot to clock in, I was here at __:___am" and your supervisor will be able to make this correction.

2. Clocking in from Time & Labor:
After logging in to Paylocity, select TIME & LABOR from the drop down or LAUNCH TIME & ATTENDANCE from the timeclock in the upper right corner, it will display TIME & LABOR and a timeclock where you can also clock in or out. The functions here are the same as via the clock in Self-service (see below).
3. Using a Kiosk Clock:
To clock in using a Web Kiosk, use the following procedure:
- Enter your Employee ID. Select Login.
- Select the desired action from the Employee Dashboard. Depending on the Web Kiosk configuration, the sections will vary and may include: Clock In or Clock Out.
- For Transfers: If you only have one department in which you work, you do not need to enter a labor level/cost center. Your time entry will default to your home department. However, If you work in more than one department and/or you have multiple work assignments within the same department, you can use Transfer or Clock In + Transfer, to update the department and project.
- Select Manual to add a correction or a note.

OTHER FUNCTIONS:
- History: Displays detail of all timeclock transactions for the past 24 hours.
- Timesheet: Displays the total week-to-date hours recorded.
- Comments: Allows a comment to display from the supervisor/administrator perspective of the timecard. Include date and time information when commenting on a specific shift.
- Schedule: If you have an assigned schedule in Paylocity, this displays the employee schedule for the current day, week, or month. If minimized, select the down arrow on the tile.
- Time Off: Make a request, view the status of pending, approved, denied, or canceled requests, and view time-off balances as of the last payroll process date.
- The Bell: Displays messages sent by administrators or supervisors.
- Logout: Select after entering the clock to log out of the dashboard and return to the login screen.
4. Using the Mobile App (Optional):
1. Log into the Paylocity Mobile App.
2. Select PUNCH from the main menu:

3. Select the appropriate Punch Type from the dropdown menu. The following clock types are available:
- Clock In
- Clock Out
- Transfer
- Clock In + Transfer
4. If you only have one department in which you work, you do not need to enter a labor level/cost center. Your time entry will default to your home department. However, If you work in more than one department and/or you have multiple work assignments within the same department, you can use Transfer or Clock In + Transfer, to update the department and project.
5. Select the Back arrow to return to the clock screen.
6. Select Add Note to add a message to the clock Type. Click Done when complete. Notes will display a preview of the message within the row title.
7. Select Submit to record the clock.
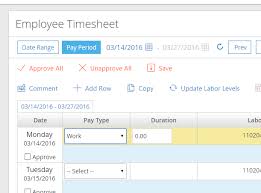
ENTERING OR MODIFYING HOURS:
Employee timesheet users, depending on their setup, may have the ability to enter hours worked. Timesheets are to be completed after a shift, work day, or week is completed. Partial entries (a clock in but no clock out) will result in an error message upon attempting to save. Please see the images and instructions below.
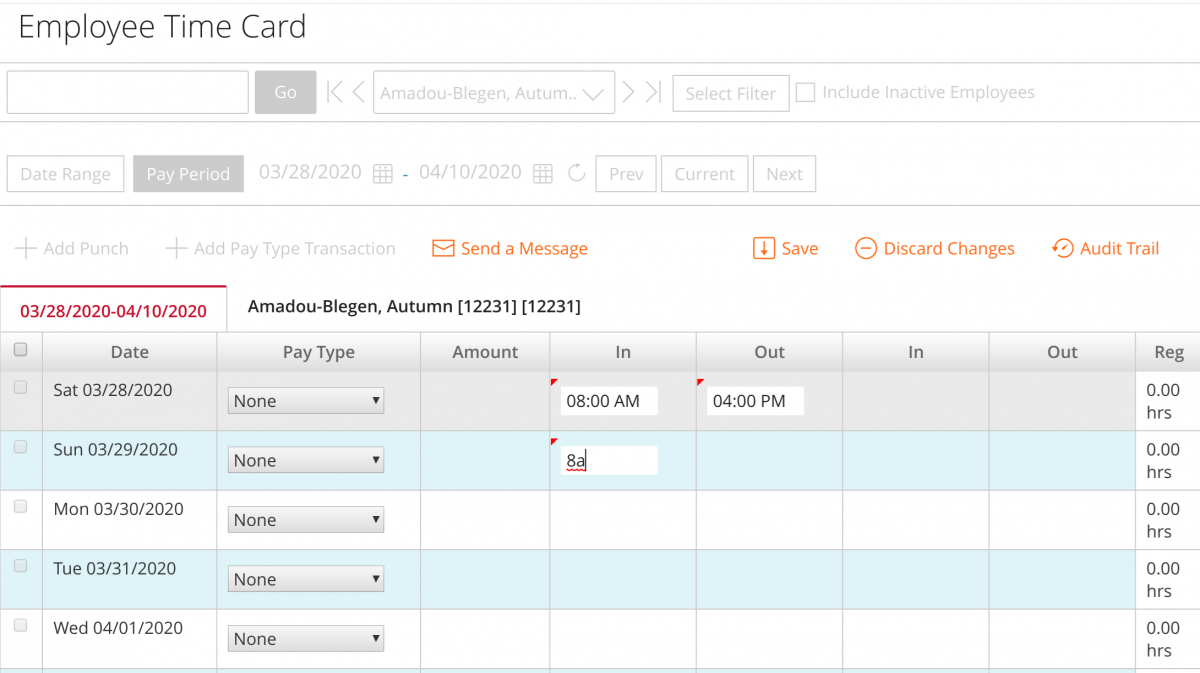
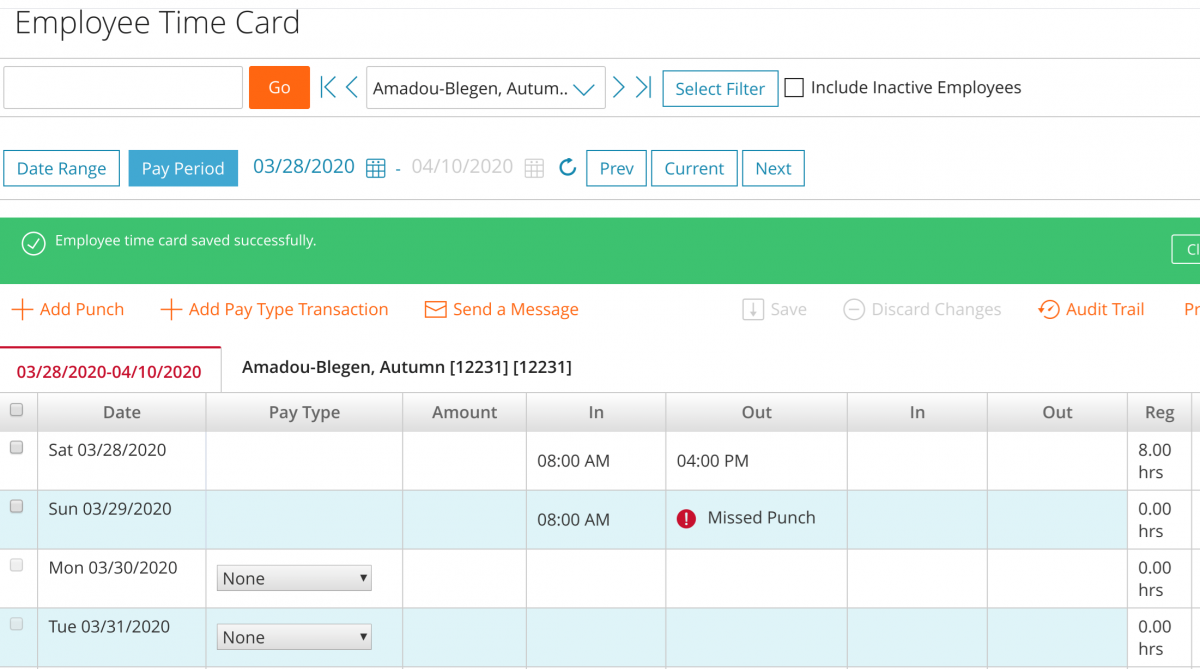
1. Users can adjust the date range to see the previous pay periods and the current pay period. Timesheets cannot be completed before the start of a pay period.
2. The Comment button at the top of the page allows users to communicate a general message to regarding the pay period's timesheet.
3. A yellow bar shows the day selected on the timecard. To add additional entries to a specific day, select the row so it is yellow and then click Add Row at the top of the timesheet.
4. To enter a time in or out for a specific day, select Work from the pay type dropdown and enter a Start Time and End Time using an AM/A or PM/P designation.
5. Employees can copy hours from one day to another by highlighting the row and selecting Copy at the top of the timesheet.
6. A pop-up window will appear and you can select the dates you would like to have the clockes added to.
7. Users who have multiple work assignments and need to transfer their hours will need to use the magnifying glass or the Update Cost Centers option. If you only have one department in which you work, you do not need to enter a labor level/cost center. Your time entry will default to your home department. However, If you work in more than one department and/or you have multiple work assignments within the same department, you can use Transfer or Clock In + Transfer, to update the department and project.
8. Employees who want to attach a note to a specific day or shift will use the Notes column.
9. Employees can approve each day individually or approve all days at once.
10. All entries or edits must be Saved before navigating away from the page or updates will be lost.
11. Users have the option to Print their timesheet.
12. Entries can be deleted using the X in the delete column followed by a Save.
If you have further questions about using Paylocity to track your hours, please email human_resources@mcad.edu.